Wednesday, May 28, 2014

Basket Case


So it's been almost a year since I posted. Leave them wanting more... isn't that a saying? No excuse except that life happened and swept me up in its tide. :)

I wanted to post a new project because the process of completing these baskets has sparked a new creative obsession in my soul. Color! Organization! Together! 

The process is as simple as pulling out your craft paint and a short bristle brush, and highlighting with color the natural patterns created by a woven basket. I did these parked in front of my computer while catching up on Game of Thrones. Fun! Easy! Together! 

My favorite is the stair-step diagonal pattern of the smaller basket. Just pick any section to start, and "move up and to the right" or "down and to the left" to create the stairs. Each basket will reveal it's own cool pattern.

Use one coat for a washed-out look, and 2-3 for a more saturated hue. 


It doesn't have to be perfect. Let the natural beauty of the weave shows through.


Tuesday, July 2, 2013

High-Five for Tie-Dye


My latest installment in MD Family Magazine is an easy and fairly mess-less tie-dye project. Tie-dye instantly takes me back to summer camp art projects and those crazy spin art machines at the mall. Oh, the good ol' days of hair-sprayed wave bangs and neon puff paint. 

This project could also add some fun to your 4th of July prep - the bursts of color remind me of fireworks and these hot summer days will help speed up the ink-dry-time!   For more pictures, check out the latest MD Family Magazine craft installment here.

Hope everyone has a wonderful 4th of July!

_________________________________

Materials:
• Pre-washed t-shirt or onesie
• Variety of permanent markers. Sharpie and BIC both make a rainbow
collection
• Plastic Solo cup
• Rubber bands
• Isopropyl alcohol 91%
• Syringe or eye dropper


1. Decide where you want to start your design and slip the cup, wide side up, in-between the layers of the shirt. Stretch the section of the shirt over the mouth of the cup. Secure with 1-2 rubber bands.


 2. Let your kids draw designs on the secured section of the t-shirt. Stick with dots, dashes, hearts and other small designs. Leave white space in between colors to give the ink room to spread. Tip – stick with a similar color family within each circle. When you add the alcohol the colors will run together. If you use clashing colors (ex. red and green) you may end up with brown or muddled colors.


3. Take a syringe full of alcohol and slowly start dropping it onto the design. You’ll see the colors start to run and bleed outwards. Add additional alcohol where needed to make sure the ink spreads evenly and completely.


4. Remove rubber bands carefully (wet color will transfer to skin or clothes) and lay shirt aside in the sunshine to dry momentarily.

5. After a few minutes, move onto the next area of the shirt and continue the above process.

6. When you’re happy with your final design, lay outside to dry completely.


7. Run t-shirts through a HOT cycle of the dryer to set colors before washing.

Tuesday, June 18, 2013

Mommy & Me Canvas Art


I'm a bit delayed with this fun post, but I'm happy to report that this Leimenstoll is officially in print! My first project with MD Family Magazine ran online, so this month is my big debut in the magazine. 

MD Family Magazine publishes 6 issues a year and is distributed in Baltimore and Howard County locations, including grocery stores, libraries, elementary schools, and other high-traffic areas. I

The June issue focuses on "100 Places to Take the Kids" and other summer activities. I cooked up a fun "Mommy & Me" Canvas Art project for families to tackle on one of these glorious summer vacation days. 

Like all parents, I have a special place in my heart for macaroni and cotton ball art - I honestly can't wait for Drew to come home from pre-school one day with his first masterpiece. However, this project lands in that great sweet spot of giving your kids a really fun activity to work on and giving you a final product that you'll be psyched to display in any room in your house.

True story - when I hung my canvas in the kitchen, my mother-in-law asked if I had picked it up during my latest trip to IKEA. IKEA is the motherland of fun design in my opinion, so I took this as a major compliment! 


Materials:
  • Canvas
  • Paintbrushes (or hands) of various sizes and shapes
  • Craft paint
  • Painter's Tape or Washi Tape 


The final goods - love the pop of color and against a neutral wall. (And love that sweet squishy baby face as well!)
Paint the entire canvas with a solid base color (example shown uses white). This will make touch-up work a breeze at the end.

Once the base layer has dried, tape down a design with painter's tape. If you're working with a smaller canvas, washi tape provides a smaller width to work with. (say that 10 times fast!) I went with a herringbone design - the funky cousin to the oh-so-popular chevron. You could also use chipboard letters or stickers to spell out a favorite saying or your child's name.


Ask your child to cover the entire canvas, including the tape, with paint. This technique will assure you a crisp design that will pop when the tape is removed. To avoid muddled colors allow for dry time between colors.


Go paint crazy! If you know what room you want to hang your finished product in, provide a pleasing palette of colors for your child to work with. If you're letting your little one finger paint, make sure you're using nontoxic materials. We don't want this project taking a turn for the worse! Feel free to play around with various brush sizes, shapes and strokes.


Once the paint has dried, peel off the tape. Using a thin brush, touch up any spots where the paint may have bled through.


Tuesday, June 4, 2013

Spread the love.


I saw this fun idea on Pinterest and knew that I needed something similar in my house. 

What a cute way to tell your kids (and husband!) all of the ways you love them. Big reasons. Small reasons. Silly reasons. Random reasons. I love you for making your bed. I love you for being kind to your brother. I love you for letting mom sleep past 6 a.m.  It's always nice to be acknowledged, and to me, it's all of those tiny things that add up to big happiness long term. 

The board also moonlights as an easy message board for a quick note or grocery list!

I found the dry erase boards at Target in the beloved One Spot;  the $1 - $5 items that are always located at the front of the store. They were so cute, colorful and perfect for this little love note project. I scooped up the stickers at Michael's and the rest is happy history.


Wednesday, May 15, 2013

Growing Up


Growth charts are popping up in all of the major kids’ catalogs right now. This is a little bit bigger than a "Nap Time" project, but it’s worth the effort for the cute factor and cost-savings. This is a great housewarming gift  or a 1st birthday gift for a friend who delights in watching her family grow! 

Materials:
  • 2x4x12 piece of wood
  • Sandpaper
  • Pint of Chalkboard Paint
  • 6” foam roller
  • Paint tray
  • Paint pens
  • Pencil
  • Chalk
  • Ruler
  • Rubber stamps (optional)
  • Drill (optional)

 At your local hardware store, purchase a 2 x 6 x 12 piece of lumber. Ask an employee to cut the piece in half so that you end up with two 6 ft. pieces of wood. Make sure you are involved in the wood selection – sometimes the lumber has large cracks and flaws. 

** Do NOT be intimidated. Just walk in that lumber department like you own the place. Or walk in like me, looking confused and tired, and eventually someone will ask if you need help!**

 Lightly sand the wood to smooth out the roughness.


Paint the entire plank with three layers of chalkboard paint. Wait 20 minutes between coats.
  
Random tidbit: The vinyl drop cloth I use for my painting projects (seen above) was our table cloth when we lived in Chicago. We had it draped over a 4-person card table, and that was our official dining room table. Fancy, right?

Use a ruler and pencil to measure the inch markers. 

**Even though the piece of wood is 6 feet long, I adjusted the inch markings to account for the wood hanging 6 inches off the floor. In other words, your last marking at the top with be 6 feet 6 inches.

Use a stencil, or rubber stamp, to trace the number markings on the chart with pencil.


Once the wood is measured and marked, draw over the pencil with a paint pen. Decorate the rest of the chart with chalk!


Drill a hole in the top of the chart so that it can be secured on the wall in the garage, kitchen or playroom. The wood is 6 feet long, so you have to hang it 6" off the floor to get the measurements right.

I plan to mark Drew's height once a year on his birthday - and I plan to do that with a permanent paint pen. You can keep track of multiple heights on the same chart, just choose a specific paint pen color for each child. 


The rest of the growth chart can be decorated by Drew with chalk - easy to wipe clean and start fresh when the creative mood strikes! You'll notice a few Drew smudges in the pic above. :) 

Below is a growth chart I made for a friend. I wanted to include a full length photo so you can see all 6 feet...and Frank. Always have to include Frank. 

For anyone reading this locally (Maryland), I would be happy to create a growth chart for you - just message me about pricing. 


Monday, May 6, 2013

My Lucky Day

I haven't gotten news this good since I received my invitation to join Pinterest. And that's saying something.

After submitting a portfolio of ideas, I was chosen to be the first Craft Columnist for Maryland Family Magazine. It was a very good thing that I was home alone with Drew when I got the news. He's very forgiving with my singing voice, and seems to turns a blind eye to my dancing.

I will be contributing kid-friendly project ideas that will hopefully inspire families to pull out their glue guns and get crafting! I'm trying to filter my projects by thinking about crafts that moms will actually want to keep on display. I know children create a lot of art over the years in pre-school and Vacation Bible School, and believe me, there is a place in my heart (and home) for cotton balls, construction paper and toilet paper rolls. However, I do feel there is a sweet spot in this category that results in a fun activity for the child and a cool finished product that mom is happy to display.

Hopefully you guys will keep an eye out for the articles. The remaining 2013 printed editions of Maryland Family Magazine will hit newstands in August and November. The other months' projects will be featured online at http://www.baltimoresun.com/features/maryland-family/

The first project was featured on Wednesday and is a great activity to get your family ready for Mother's Day (read: THE MOST IMPORTANT DAY OF THE YEAR)


Thursday, May 2, 2013

Answering the call...

We have officially lived in our house for 3 years. For some (read: most) families, 3 years is not that long. For our little family, 3 years is a lifetime. A.J. and I moved 4 times in the first 4 years of our marriage for various job and life opportunities. I wouldn't change a single decision, but my good friend Ann's father used to say "Don't move near Meghan, her stuff's on wheels"! 

When we moved in to our townhouse I was thrilled when we got to the point where the house felt fully decorated. Curtains hung - check. Pictures on the wall - check. Walls painted - check. But now that we've been here awhile, I hear the house whispering for a refresh. So as life is giving us a little pocket of downtime, I'm answering the decorating call by starting in the kitchen.


These pictures have hung in every house we've lived in, and they were my first big decorative purchase for our first house. I have a vivid memory of painting the gold frames black in the bumpy driveway of our sweet house on Skipwith Rd. If you look around you'll see these prints everywhere, but I love them  for all the good sentimental reasons. They're getting packed away for now, but will hopefully make a return to the walls in the future.

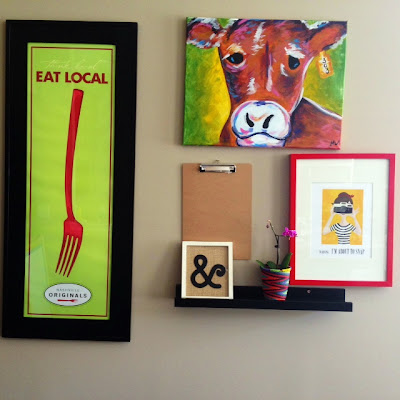
The need for more photo space and the desire to display some of the art we've collected over the past few years led me to this final product...


Sorry for the weird pic - I had a hard time getting everything in the shot!


Notes:

I'm obsessed with these picture ledges from Ikea - they're streamlined, affordable and provide some creative space to lean frames or put small items on display. 

My girlfriend Jessie gave me the awesome birthday gift of a class at Wine and Design in Richmond. We spent a lovely afternoon in March sipping Prosecco and painting stress-free Cow faces. Sounds weird, but trust me, it was so fun. I named my cow Boyer after the very best Richmond ice cream shop in all the land. 

The Fork is a personal favorite. Whenever we go back to Nashville, my husband's hometown, we try to eat at one of the Nashville Originals restaurant. The city is onto something - local restauranteurs have joined together to increase the visibility of local restaurants as more and more chain restaurants pop up. We were at Tin Angel and I saw this cool poster hanging on the wall. Once we were back in MD, I looked on the website to see if I could purchase a print. No luck. I took a stab in the dark and called the restaurant. I spoke to the owner and he told me that they weren't for sale, but that he had a few extras in his office and he'd be happy to give me one. Score! I love generous people. My mother-in-law was still living in TN at the time, so she picked it up and now it hangs on our walls as a fun reminder of A.J.'s southern roots, good food and the importance of supporting local business.

The clipboard is there to display all of the future artwork that Drew creates. I'm basically counting the days until he's old enough to wield a crayon. Coloring was such a great part of my childhood, and I can't wait to share that creative time with Drew. For the record, I was an in-the-lines colorer. 

I couldn't find a cork board that I liked, so I bought a frame, removed the glass and bought cork to fit. 

Drew's big-headed silhouette makes me smile every time I see it. It also reminds me of the silhouette wall in my grandparents' house - my mom is the oldest of 5, and I have a strong memory of seeing the collection of 5 sweet girl profiles on their walls.

Between this new display, the removal of Drew's exersaucer (hallelujah!) and the addition of an easel (future project) and new rug, the kitchen is feeling fresh and new. Maybe this new eye candy will inspire me to cook a little more - I'm doubtful, but hopeful!